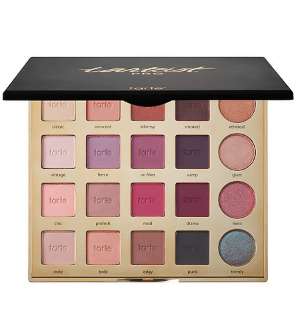
Today I am introducing a pretty new product, Tarte Cosmetics ‘pro to go’ palette! A mini version of their Tarteist Pro Palette! (**The colors are exclusive to this mini palette – SO they are NOT the exact same as the Tarteist Pro Palette)
All Thanks to Sephora & their partnership w/ Tarte Cosmetics ❤
As always, I’d like to take a mini second to thank every viewer & reader on wordpress for reading today! I want to make this review short & sweet since I’ve also included a featured makeup look – if you follow me on instagram then you’ve probably already seen it but I have included a mini written tutorial all the way at the bottom if you’d like to skip the review!
Let’s get started! 🙂


PROS
Sexy packaging – very sleek and classy packaging, probably because this is for the ‘pro’ collection. In comparison to their ‘tartelette’ tease palette, the packaging colors [the tartiest pro to go palette] look more professional(?). I’m unsure if that’s the right word to use but that’s how I see it! 🙂
*click here to read a mini review of their tartelette tease palette!

Amazing pigment – with just a little rub/swatch the pigment picked up super nicely on my fingers! As pictured below you can see each color, with the exception of ‘drive’ and ‘hype’ since they kind of just blended into my skin.
*M = Matte
*S = Satin

Very blendable – I could blend the matte colors effortlessly, as well as the satin colors. I noticed the satin colors applied a little better on the eyelid when I used my finger. I personally think this palette has awesome neutral colors.
Smell – Just like I described in my mini review of the ‘tartelette tease’ palette, the smell is almost like chocolate, or coca powder! It’s not to overbearing – it’s quite pleasant!
CONS
Price – This miniature palette is $23.00 USD. In all reality this is the average cost of a ‘travel size’ palette BUT this could pose a problem for those who are not as inclined to spend $23 on a MINI palette when the regular PRO palette is $53.00 USD – which include MORE colors!
ON THE OTHER HAND … If you’re a person who doesn’t need a 20 shadow palette – (i.e you don’t have time to play with makeup/not interested in that many colors) … then this mini palette is perfect for you!
Colors – I personally like this palette and its color scheme BUT the colors ARE VERY WARM. If you are more on the fairer side, and believe warmer colors don’t suit your skin tone, you may shy away from this palette.

I honestly don’t have much to complain about this palette – BUT I will say, if I hadn’t received this from Sephora I probably would NOT purchase this palette… I’d invest my money on the Tarteist Pro Amazonian Clay Palette ($53.00 USD) (pictured below)

This concludes my mini review – as always these are my own opinions and I would love to hear yours!!! Did you buy this palette? How do you feel about it? Would you consider buying this palette?! Etc.

Simple Eye Look using Tarteist Pro To Go Palette:

1 – I always prime my eyes with TooFaced Cosmetics 24h shadow primer – Very important step to prevent your shadows from creasing/disappearing at the end of the day
2 – I applied ‘DRIVE‘ all over my lid in order to set my primer (prevent from creasing) & I also applied this color INTO MY CREASE until I get the desired color (super light brown)
3 – I applied ‘CRISP‘ in the same spot as I applied DRIVE (into my crease) – if you notice, there is a nice warm brown as my transition color in the picture above, that was created by BLENDING ‘crisp’ & ‘drive’ together
4 – With a smaller, more defined brush I used the color ‘STYLIN‘ & blended it ONLY in the outer & inner corner – again looking at the above picture, theres a deep brown shade on the left & right side of my eye. AT THIS POINT, THERE SHOULDN’T BE ANY SHADOW ON YOUR CENTER LID *Blending is KEY – I want this look to flow and look as defused as possible!
5 – Lastly I applied ‘HYPE‘ at the center of my lid using my finger
*To defuse where I applied my lashes I used a dark brown liner on top of my lash line & blended it with the color ‘STYLIN’

Thank you all for reading/review today’s post! I’m continuously trying to think of interesting posts! Feel free to leave comments below ❤


